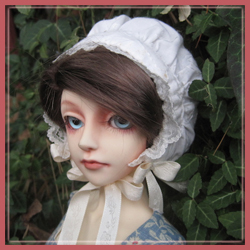

 This is a simple pattern to make a basic “house bonnet” for 1/3 size girls. A house bonnet was a common clothing item worn by women for centuries. They were last popular in the earlier part of the 19th century. While they varied in degree of ornamentation and some were made with more pattern pieces, many were similar to the pattern here. They were designed to cover the hair, had no brim, and tied under the chin. Most usually had a cord tie to the back to gather material at the nape of the neck. This bonnet may be made that way, but my version uses thin elastic so the base of the bonnet is permanently gathered. I have also made a version with elastic included in the front to hug the head. I made this bonnet with various light cotton materials, but a fine handkerchief weight material would be closest to the originals of the late 18th-early 19th century.
The bonnet was designed to fit 1/3 girl dolls with larger heads like my DollZone Orlando. The pattern can be shrunk to fit smaller heads. I hope to present a smaller version with an additional PDF pattern later this week. This bonnet may be used for period fashions or adapted for fantasy head-wear.
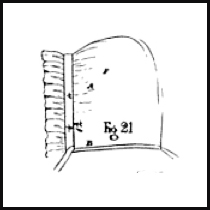
(Antique Bonnet illustration from The Workwoman’s Guide published in 1840, available free from Google Books.)
To make this project you will need:
house-bonnet-back pattern piece
thin cotton material
matching thread
1/4 inch elastic (I prefer elastic that is designed not to twist or roll)
ribbon
Option – decorations
1. Download the pattern piece . Cut out one the bonnet body on a fold. Mark the gathering points on the material.
2. Using a basting stitch, gather the material from one spot to the other.

3. Place the gathered back on the doll’s head. The doll should be wearing a wig to judge how the cap will fit with the extra bulk. The pattern was designed with extra material at the bottom to allow the base of the cap to be adjusted. The base needs to be folded over and sewn. If the material goes below the nape of the neck even after it is folded, trim any excess, refold and sew. This will form the casing at the back of the bonnet. The folded casing should be wide enough to fit the elastic.

(If you wish to create a more authentic bonnet, step 3 and 4 will be as follows: Pin the casing. Find the center point at the back of the casing. Mark it. Undo the pins and sew a button hole at that spot. Instead of elastic, you will sew ribbon or cord at the ends and run them inside the casing to hang out of the buttonhole in the center of the casing. The cords can then be tied to gather the material to fit the doll.)
5. To make the band for the front of the bonnet, cut a strip of material. Mine was 2 7/8″ wide. This width can be varied as desired to make a wider front piece. It can also be bound with a wide ribbon instead of a cloth strip.
The length of front piece should be a little longer than than that needed to run all along the front of the bonnet including extra to fold under at the ends. I usually add an inch or two extra to my strip in case my measurements are off.
6. Iron your strip of material as shown. First iron the sides of the strip so they are folded inward. Then fold the strip in half making sure that the sides line up as closely as possible down the whole length.


7. Bonnet version 1: Pin the strip to the bonnet back as shown, sandwiching the gathered material between the strip. Fold the ends under. Sew the front to the back of the bottom. I hand sewed my bonnet and sewed the outside and inside layer simultaneously. Some may find it easier to sew the outer fold first, then the inner fold afterward. Add 2 ribbon ties and sew across the ends of the strip. Add lace to the front of the bonnet as desired. (Another possibility is to use a strip of material gathered and attach it instead of lace. This works best with thin light materials.)


Finished bonnet: These bonnets may have used a hat-pin to help hold the bonnet into place. Pins were commonly used to attach women’s head gear securely.


Step 7 bonnet version 2. Follow all of the direction for bonnet version 1. The only difference is to add elastic to the front of the hat after it is securely sewn onto the back but before adding the ribbons and sewing the ends. Allow the elastic in the casing to gather that material lightly. Using the elastic allows the bonnet to stay on the head with less slipping. It is less authentic, but tidier and easier to use. In this version, I additionally stitched together ribbon to make little bows and sewed them at the ends of the bonnet front above the ties. They are each accented with a crystal bead.


Featured Article