
By Martha Boers of Antique Lilac
Part 1: Make a Festive Elf Hat
*this pattern was designed to fit an Iplehouse BID, or any other doll with a 7″ head circumference, and wearing a wig.
Each Holiday season, all my tiny dolls dress up as elves to frolic in the decorations, play in the snow, and help Saint Nicholas. This pattern tutorial is for the hat and collar, which will turn my “Simple BID Dress” into an Elf costume. The free patterns and instructions for the Simple BID Dress can be found on my website – HERE.
Materials for Projects:
– red, green, and striped fabrics, and small strip of light green stretch fabric
– matching coloured thread
– scissors
– pencil
– Fray Check
– needles and pins
– red and green embroidery floss
– one medium size bell and 23 tiny bells
– beads & ribbon for embellishment
General Instructions:
1. Download and print pattern pdf, and cut out patterns. Note that several of the pattern pieces are templates, which do not include seam allowances. Trace hat brim template onto fabric with pencil.

Collar instructions may be found HERE.
~~~~~
Hat Instructions
H-1. Cut hat brim out of double layer fabric, making sure to add 1/4 to 3/8″ seam allowances all the way around.
H-2. Sew along traced line around front edge of hat. Clip corners and edges, and apply a drop of Fray Check to each outer and inner corner.

H-3. Turn right side out. Press. Mark center with pin.

H-5. Match up pins in hat and brim with right sides together, and pin the whole length of brim.

H-7. Sew lining back seams together. Slip lining around hat with right sides together, and pin into place.

H-7. Sew lining back seams together. Slip lining around hat with right sides together, and pin into place.

H-8. Hand baste, then machine stitch all the way around. Clip corners and edges.

H-9. Turn lining to inside, and hand-baste along edge to hold lining inside hat.

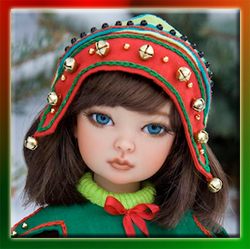
H-10. Using contrasting coloured embroidery floss, chain stitch decorative edges as shown. For detailed instructions on how to do chain stitch – http://www.antiquelilac.com/embellish-with-chain-stitch—tutorials.html

H-11. Embellish with beads and tiny bells as shown – or as desired. *The end of the hat has a single medium sized bell, with 5 tiny ones around its base.

Part 2 on making the collar will be posted tomorrow.
~~~~~

Featured Article
Amazing talented woman sharing her knowledge and creativity. Her website is a plethora of beauty and inspiration!
OH your work is BEYOND anything I have seen on here . . You’re remarkably talented and quick on the ideas of symmetry and design.. You’ve combined this pattern with an idea, and im sooooo pleased and proud to have found your lovely patterns.. Blessings, and always a friend, Mary F.
Quelles jolies poupées et que leurs habits sont beaux et originaux !!
J’aimerais beaucoup savoir où trouver ces poupées ; je suis une jeune grand-mère et j’ai envie de gâter ma petite fille !…
Merci beaucoup pour vos idées et votre talent !
Parabéns. Maravilhoso. Obrigada por partilhar.